
Place a slide mount into the cuttlebug folder being careful where you place is as this pattern will create the top of your box - I did a couple

Run it through

And you should end up with something like this

Choose the one you want to use and sand it down

Using double sided tape (or other glue), start to prepare some of the slide mounts ready to be stuck together

Cut a piece of backing paper big enough to cover the hole and stick it down on one of the slide mounts - This will be your back piece
Stick another slide mount directly over the top to create a sandwich - Put to one side for the moment

Stick another slide mount directly over the top to create a sandwich - Put to one side for the moment

Take your embossed slide mount and a plain one. Stick a piece of acetate on the inside of each one


Take your image and place it on the acetate side of the plain slide mount. When you have it in the right place, stick it down

Then take your embossed slide mount and stick it over the top of the plain one with the image on - so in effect you have sandwiched your image between two pieces of acetate - set aside for the moment

Go back to the slide mount with the backing paper on and mount another 5 or 6 slide mounts on top, thus building up a stack

Once these are all stacked, take your top embossed piece with the image sandwiched in acetate and stick it on top of your stack


From a side view, they should look something like this
And from the top, like this


To make the edges of the box I used a piece of window lead. It is very, very soft, goes though the cuttlebug and bends very easily. But as an alternative you could use metalic foil tape


And from the top, like this

Using a range of different products you can enhance the embossing or leave plain if you wish

I chose to use the gold rub n buff

To make the edges of the box I used a piece of window lead. It is very, very soft, goes though the cuttlebug and bends very easily. But as an alternative you could use metalic foil tape
I measured the amount I needed

Chose an embossing folder and ran through the bug

Turned it round and did the same to the other end, unfortunately they didn't meet in the middle and there was a space of about a centimetre!!!
I peeled the backing tape off and then began to carefully wrap the lead around the stack of slide mounts


I peeled the backing tape off and then began to carefully wrap the lead around the stack of slide mounts


Finished edges

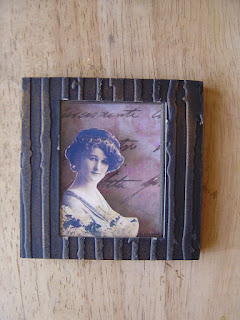
Final piece - obviously you can add any further embellishments or colours as you wish


This tutorial was created and inspired with the permission of Sue Abbott formerly of Paper Paraside. Please take time to check out her blog for other inspiring creations

