skip to main |
skip to sidebar
Supplies needed: Cuttlebug or other embossing machine, embossing folders, glossy card stock, waxed paper, iron, craft sheet, brayer, ink pads (rainbow if possible) Run the waxed paper through your embossing folder
.JPG) Take a piece of glossy card and place it gloss faced up
Take a piece of glossy card and place it gloss faced up.JPG) Place your embossed piece of waxed paper on top of the glossy card
Place your embossed piece of waxed paper on top of the glossy card.JPG) Now place another piece of glossy card on top, gloss side faced down. So you should have a sandwich of glossy card, waxed paper and glossy card. The glossy sides should be in contact with the waxed paper
Now place another piece of glossy card on top, gloss side faced down. So you should have a sandwich of glossy card, waxed paper and glossy card. The glossy sides should be in contact with the waxed paper.JPG) Using a warm iron, iron your sandwich. You should get a feel for when it's done as the card will 'slip' due to the wax being transferred from the paper onto the glossy card
Using a warm iron, iron your sandwich. You should get a feel for when it's done as the card will 'slip' due to the wax being transferred from the paper onto the glossy card.JPG) You will end up with your waxed paper which has lost its wax, and a negative and positive of the pattern on the glossy sides of your card stock
You will end up with your waxed paper which has lost its wax, and a negative and positive of the pattern on the glossy sides of your card stock
.JPG) Ink up a brayer, preferably a rainbow one
Ink up a brayer, preferably a rainbow one.JPG) And brayer your glossy card - I used the Kaledicolor bouquet ink pad for this one
And brayer your glossy card - I used the Kaledicolor bouquet ink pad for this one.JPG) The Kaledicolor birthstone ink pad for this one
The Kaledicolor birthstone ink pad for this one.JPG) The woodlands Adirondack ink pad for this one
The woodlands Adirondack ink pad for this one.JPG) The Adirondack rueberry ink pad on this one, but I also used a babywipe to wipe away some of the ink
The Adirondack rueberry ink pad on this one, but I also used a babywipe to wipe away some of the ink.JPG)
Supplies needed: Johnsons Klear floor wax, clear embossing powder, re-inkers, heat tool, craft sheet, permanent ink pad, stamps, walnut crystals, card stock, paintbrushes Stamp the card with your image(s)
 Cover your card in Johnsons Klear floor wax
 Dip your brush into the walnut crystals
 Move the crystals around the card using a paintbrush
 Avoiding the main image(s)
 Dip your brush into the re-inkers and start to colour in your main image(s)
 When you have finished colouring your image(s), tear around them
 Cover the whole of the card in clear embossing powder
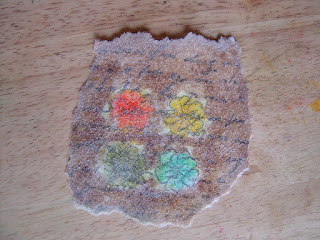 And heat
 Give your card another coat of Johnsons Klear floor wax
 Add another coat of clear embossing powder
 And heat again - you can do this as many times as you wish to create depth
 When cool fold your piece
 Then fold the opposite way (to create squares)
 Your cracked glass effect is now completed
Supplies needed: Stampbord, co-ordinating size memory glass, alcohol inks, blending solution, applicator, embossing powders, clear embossing pad / pen, heat tool, craft sheet, super sticky red line tape, permanent ink pad, stamp of choice Apply three colours of alcohol ink to the applicator
 Apply sparingly to your stampbord
 Use your blending solution and more colour if required to create your desired background colour
 Stick your super sticky double sided red tape to the edges of the memory glass
 Cover all 4 edges
 Dip 2 sides into embossing powder, hold with tweezers and blast with heat tool
 Do the same to the other 2 sides
 When cooled down, cover the edges you've just heat embossed with the clear embossing ink
 Apply another coat of embossing powder in the same colour and heat again. Apply a further coat of clear embossing powder
 Ink up your stamp
 Stamp your image on the memory glass
 Attach the memory glass to the stampbord (I used diamond glaze around the edges)

.JPG)
.JPG)
.JPG)
.JPG)
.JPG)
.JPG)
.JPG)
.JPG)
.JPG)
.JPG)
.JPG)


